End of January
The New Year has got off to a bad start really with the gardening team being broken up with my father in law's recent death. He's finally gone to the big vegetable garden in the sky. Dad and I worked tirelessly together on my garden until his illness three years ago and whilst i've continued the work he's always been there to oversee my efforts and watch it's continued progress. He really was a dedicated veggie gardener who taught me so much and really got me growing seriously whereas before i'd just dabbled and pottered. He will be missed very much but i hope that he continues to watch over the progress from his elevated status.
Despite the strain over the past few months with Dad's illness i've been itching to get going in the garden and whilst the weather has been nice and warm we've also had a lot of winds which doens't help. I'm always amazed at the amount of stuff that gets blown around in the garden and just how much of a mess is left behind. The continued high winds literally scalped the plants but i've also noticed one or two of them have broken bud too.
Despite the strain over the past few months with Dad's illness i've been itching to get going in the garden and whilst the weather has been nice and warm we've also had a lot of winds which doens't help. I'm always amazed at the amount of stuff that gets blown around in the garden and just how much of a mess is left behind. The continued high winds literally scalped the plants but i've also noticed one or two of them have broken bud too.
 I'm planning on growing some bedding plants this year from seed so have been busy making my paper pots. They are quick and simple to make and are perfect for starting off seedlings and can be planted on complete as the newpaper will biodegrade.
Need to get stocked up on potting compost though so will pop along next week to the garden centre and see what offers are on. Will be a dangerous trip as no doubt i will come out with lots of impulse purchases too.
Need to get organised and get my paint/stain organised for the garden furniture. I seem to have loads of painting to be done this year with the fencing needing a coat of paint too.
I also need to revamp the front garden and thin some of the shrubs and plants. Have a some rather nasty roses in the front garden which seems to have become overgrown all of a sudden!
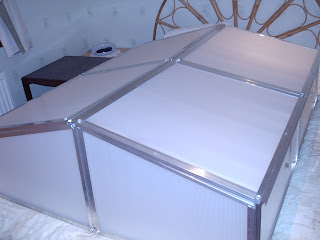
We finally finished putting the cold frames together....hmmm a bit larger than i had thought they were. As you see one alone covers the double guest bed, so i'm hopin they will give ample growing space. We're now just waiting for the weather to settle a bit and then pop them in the garden and anchor them down. Can't wait to start using them.


5 Comments:
OK - i can't help myself....
Why is there a cold frame on the bed - to cool things down a bit or heat them up.....
Sorry, I know..... I'm a bad person.......
Stuart
Sea Fishing and Walking in the UK
tee hee ;-)
hi love your blog and sorry to hear about your dad
Your paper pots are a brilliant idea! Do you just roll and fold:-)
Your father will be remembered every day and I'm sure you will feel he is close by occasionally keeping his eye on you. I feel that with my own.
Thanks for your comments.....re the paper pots this is how i do them....sorry if i confuse you all with my ramblings but it's real Blue Peter stuff.....I use a small jam jar or glass as you need the open neck to make the bottom
Open one full sheet of newspaper so that it lies flat. Fold in half lengthwise. Fold in half lengthwise again so you have a long, narrow strip of folded newspaper.
Start at one end and roll the newspaper around top of template (open neck end of the jar or glass). Leave about 1 inch of the newspaper overlapping the neck of the jar (depending on diameter of jar). You now have a narrow strip of newspaper that has been wrapped around a glass jar with part of the newspaper overlapping the open end of the jar/glass.
Push the ends of the paper into the open end of the jar. This step doesn't have to be neat and tidy; just stuff the overlapping newspaper into the jar. Pull the jar out of the newspaper pocket.
Push the bottom of the jar into the newspaper cup, squashing the folded bottom to flatten. This step will seal the bottom of your pot. The potting compost will make the bottom more secure.
Pull the jar out and you have a finished paper pot.
Post a Comment
<< Home